What is Online Activation and License Management?

Online activation license management is a proven and generally accepted way to register and protect software.

A software product today is usually a free-to-try product of a kind. This means anyone can download it and use it without paying money. At the same time, such downloadable version is usually limited – either time limited or limited in its functions. In order to unlock the entire possibilities of a product and to be able to use it beyond the trial period, a user must purchase the software.

So let’s say, some user purchases the software. The vendor of the software gets notified about the purchase and now should unlock the full functionality of the product and remove any time restriction it has. How is this done?

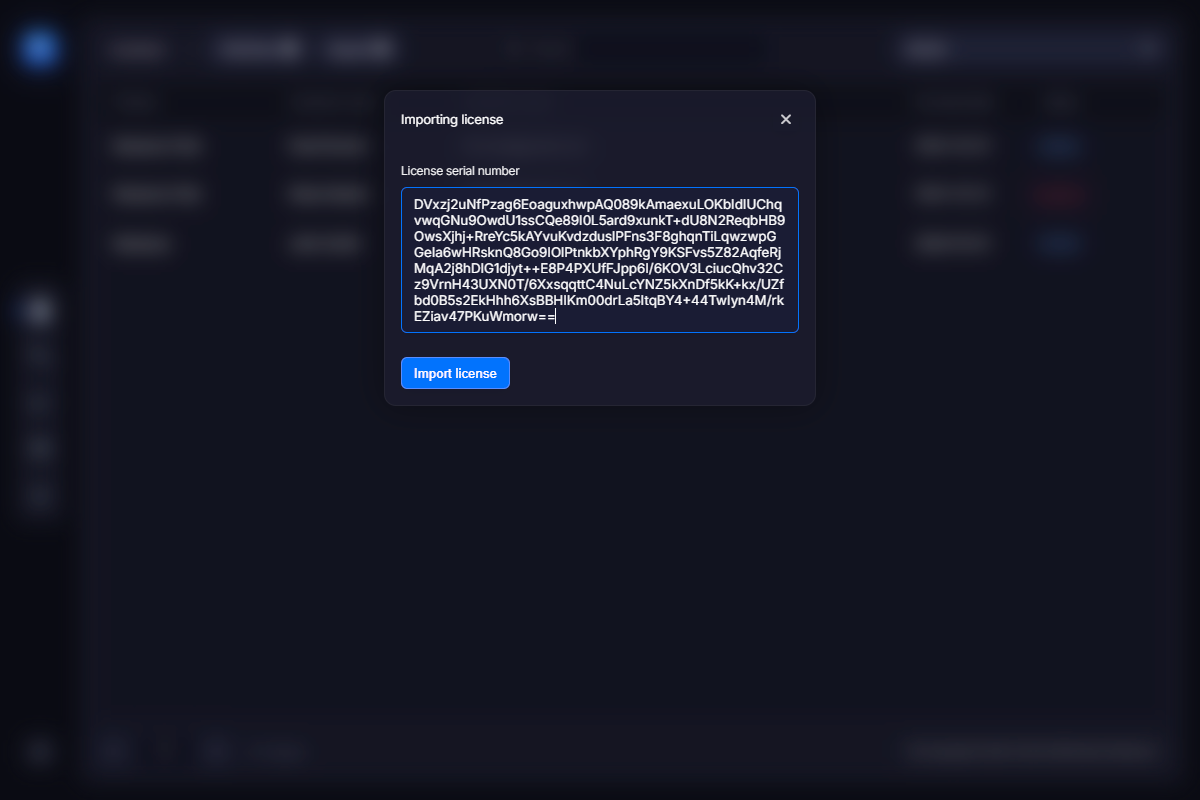
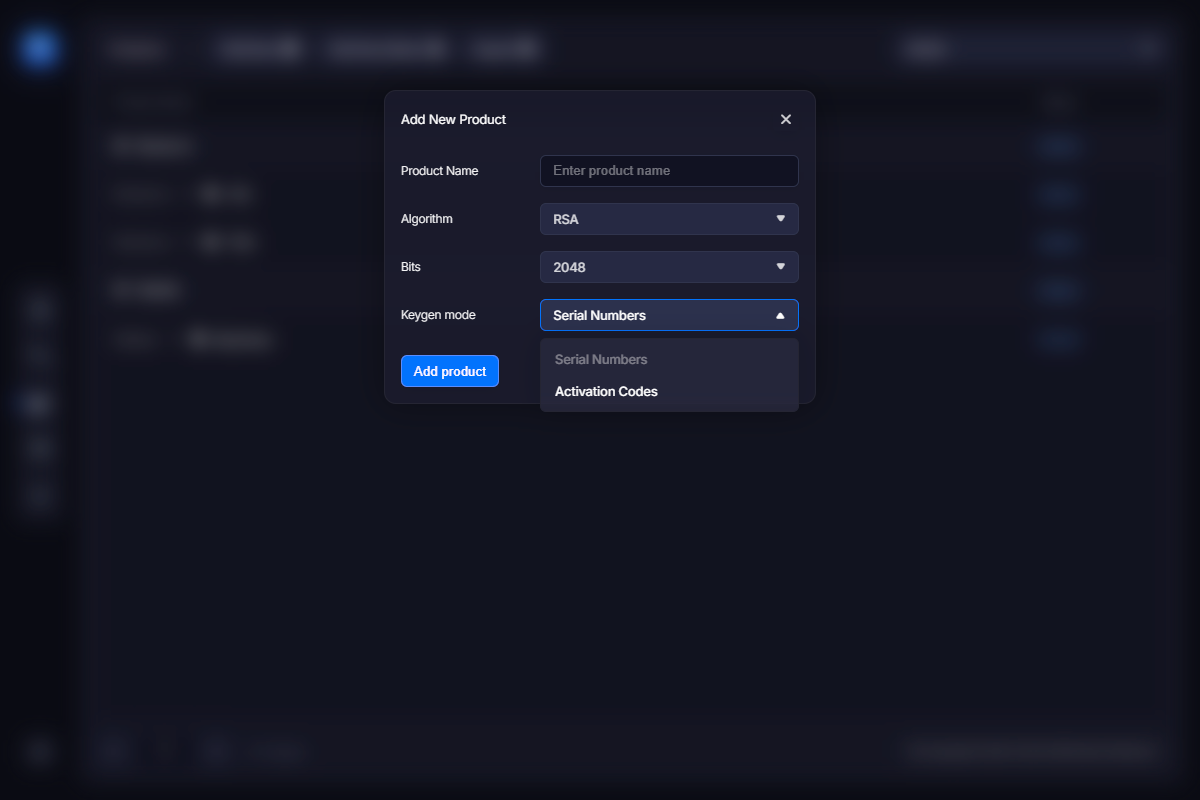
Time and functional limitations are implemented using some kind of software protection system like VMProtect Ultimate. So the trick is to let this protection system know that the software is now purchased and should work in its full strength. Registration keys (license keys, activation codes) are used for that. Surely, you have seen many of them. Here is how it works.

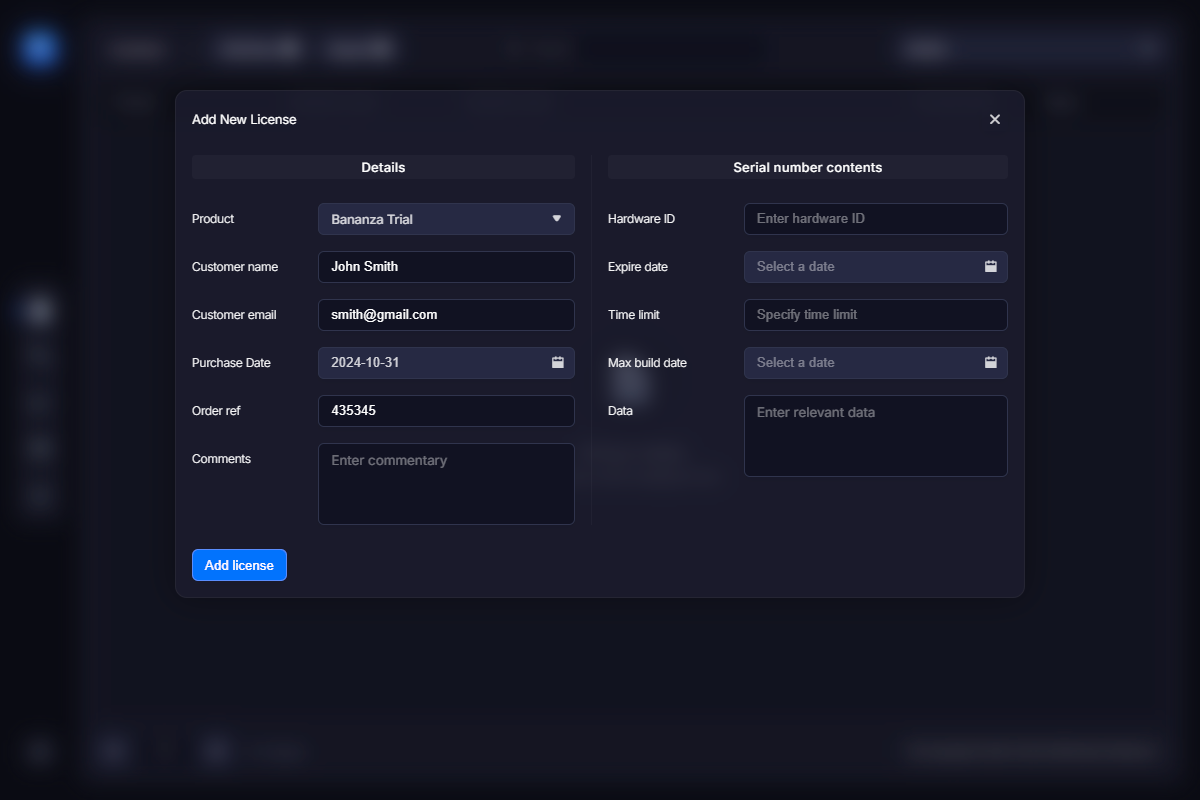
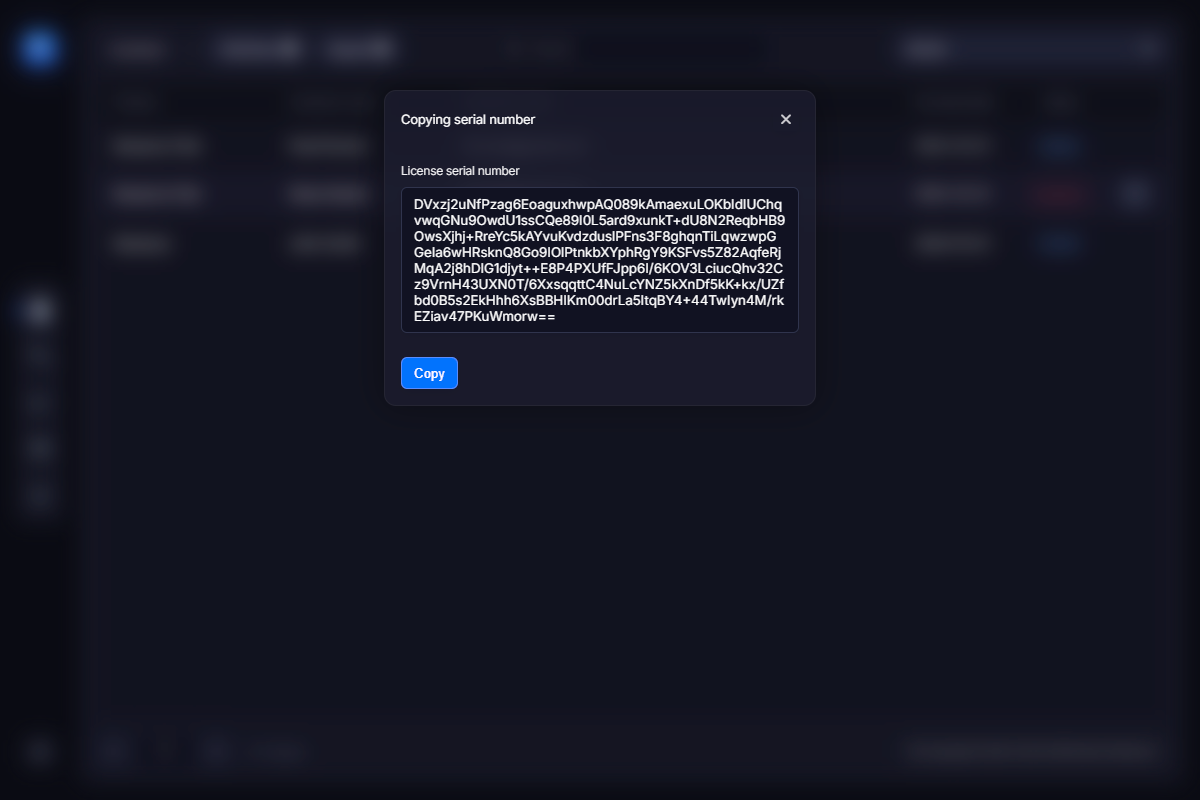
Upon purchase, a user receives his personal registration key. Then, he should enter this key in the application. The application sends an encrypted query to the activation server and passes the registration key to it. The activation server checks if the key is valid, generates a serial number and sends it back to the software. The protection system of the software applies the serial number and finally unlocks certain functions of the application and removes all time limitations.

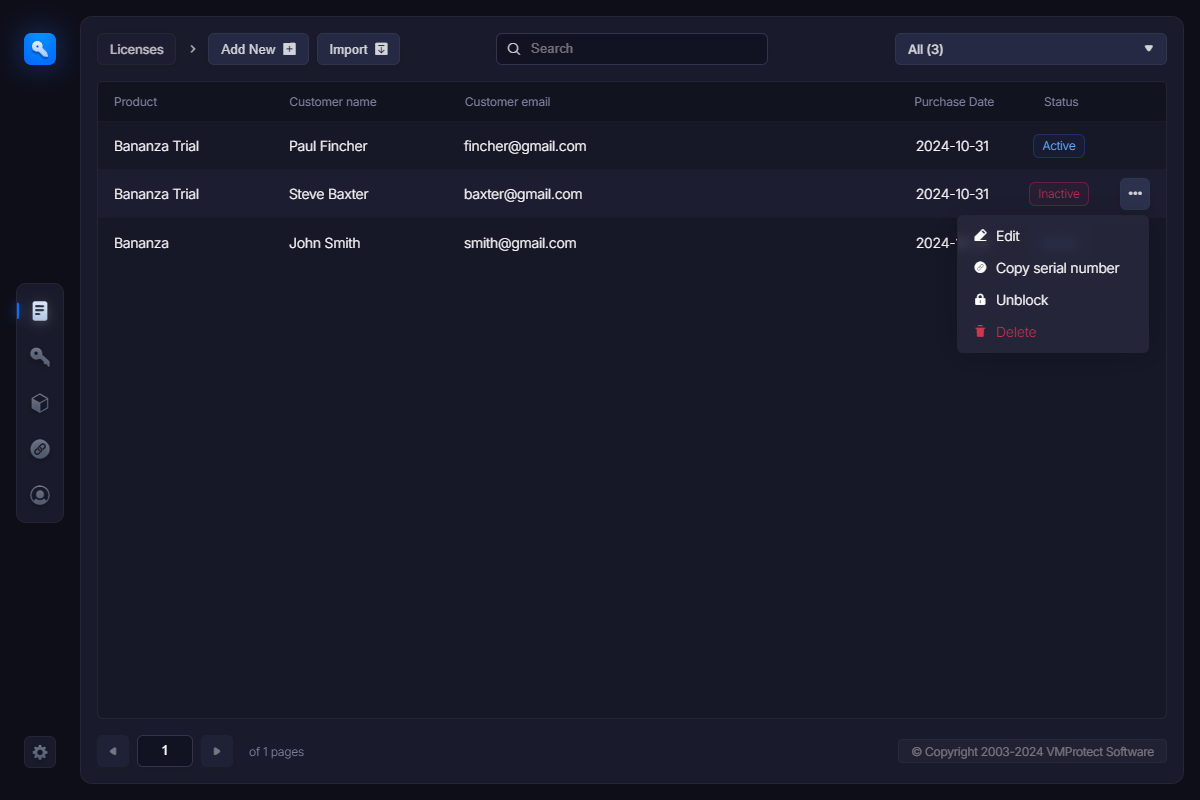
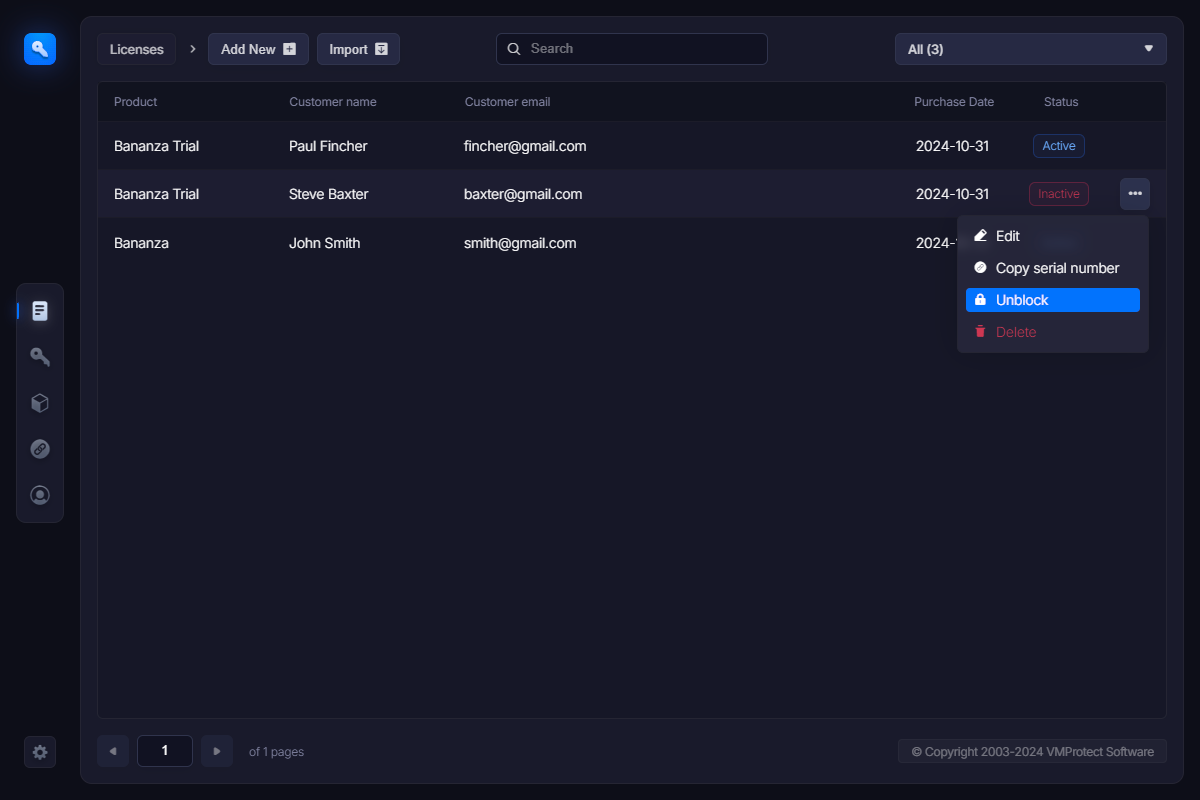
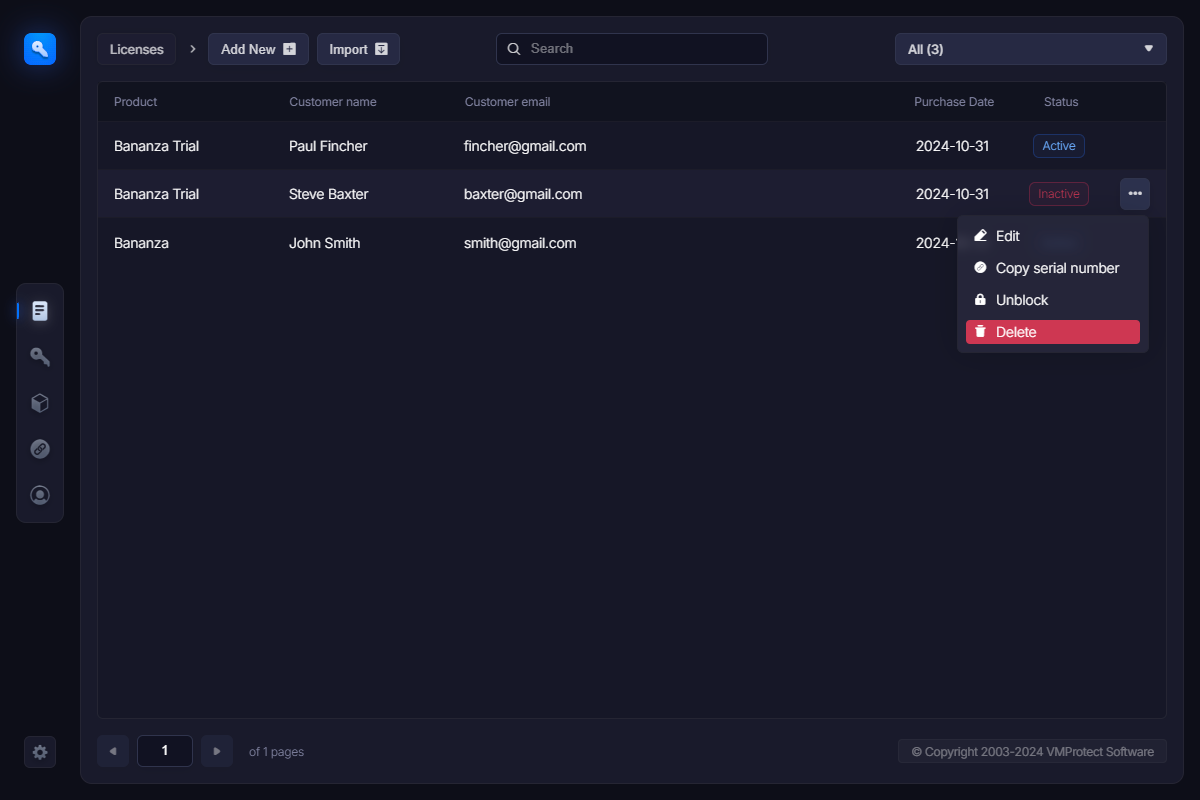
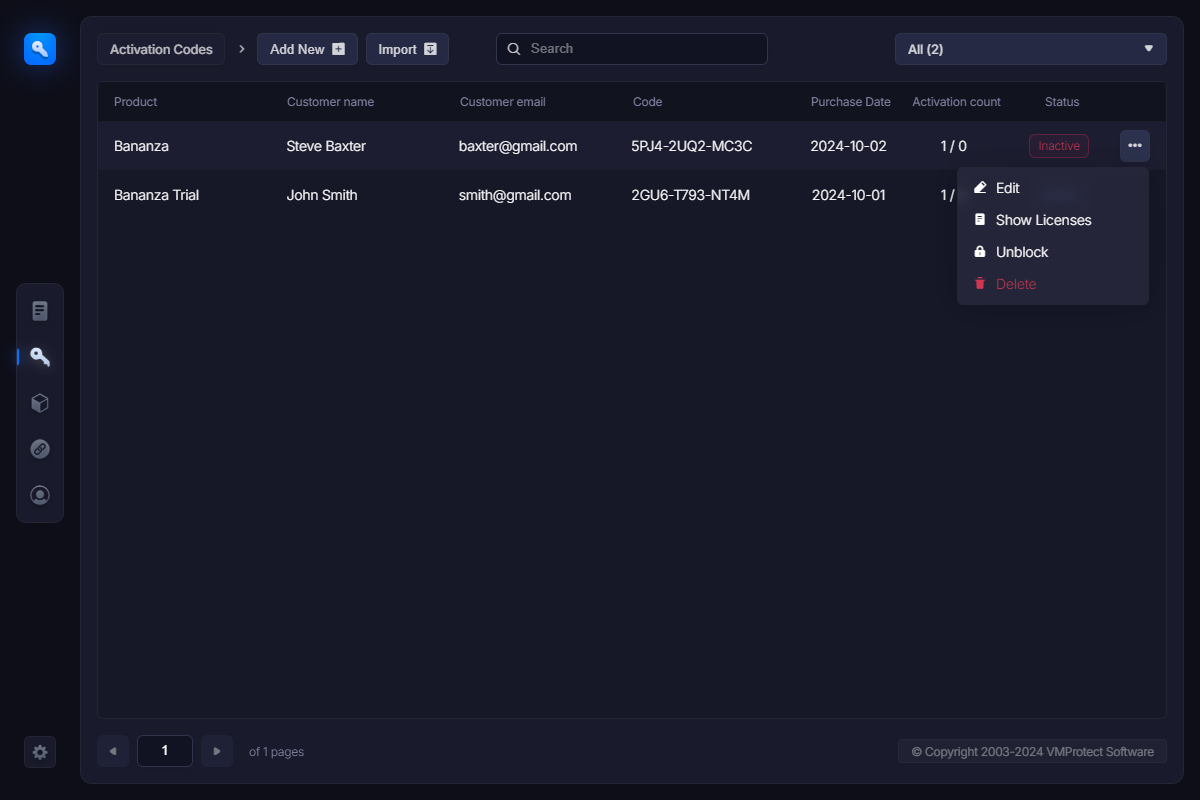
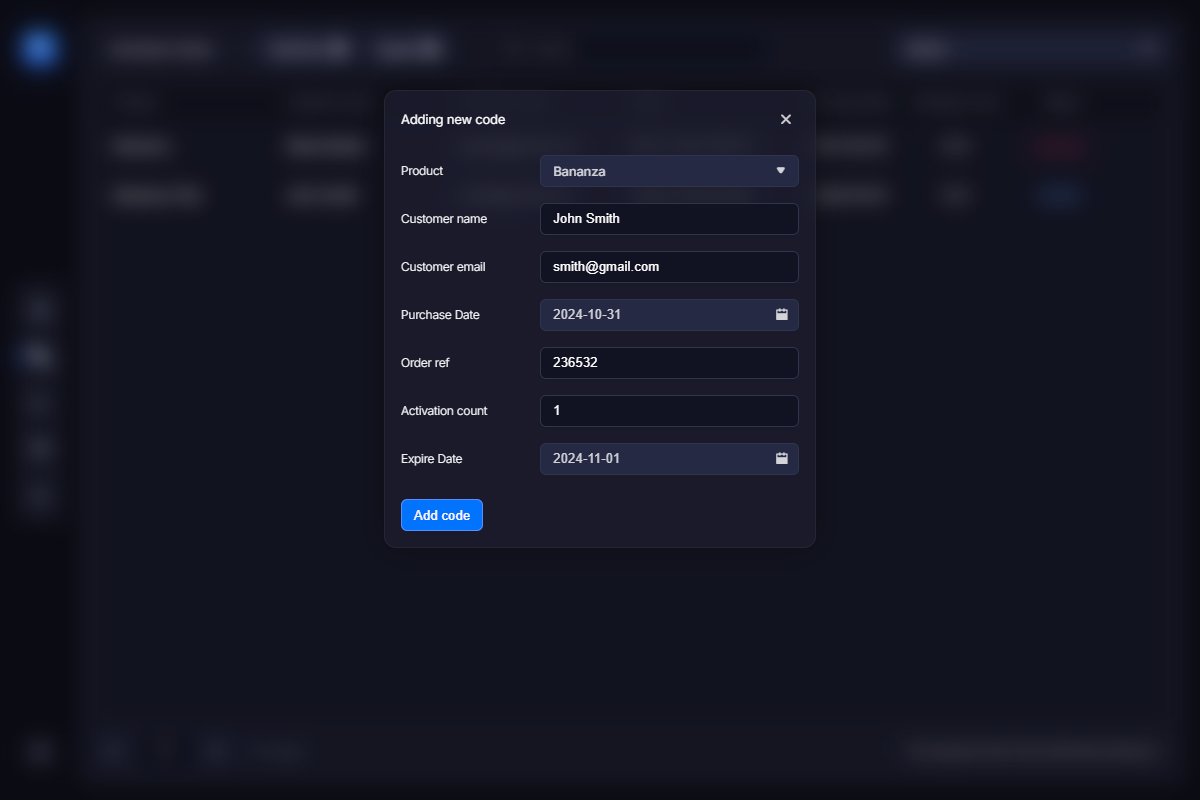
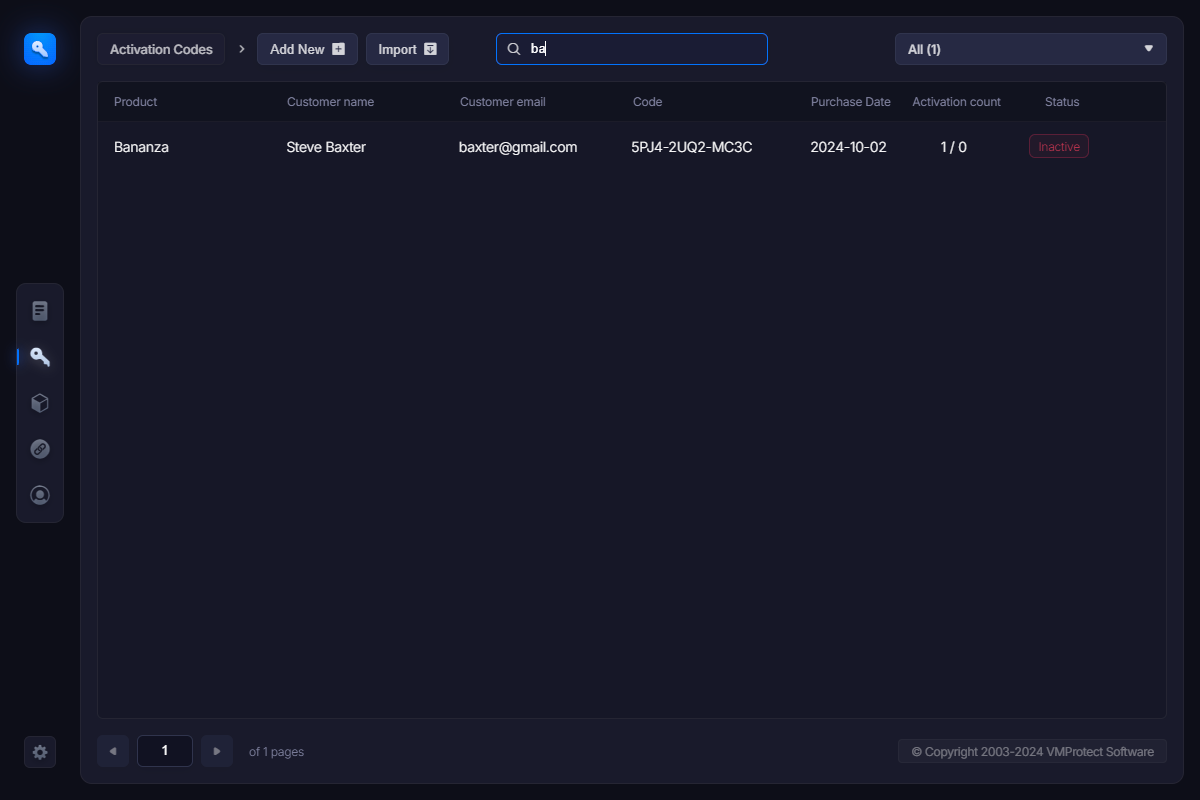
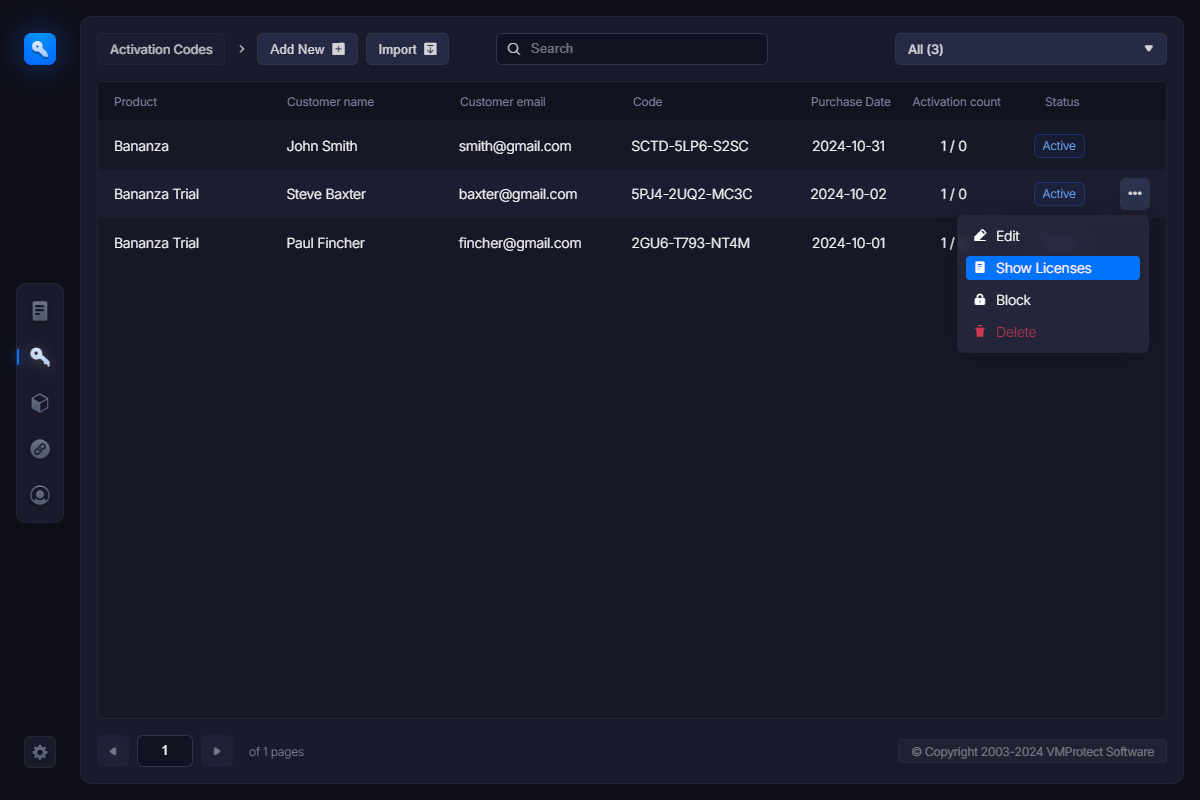
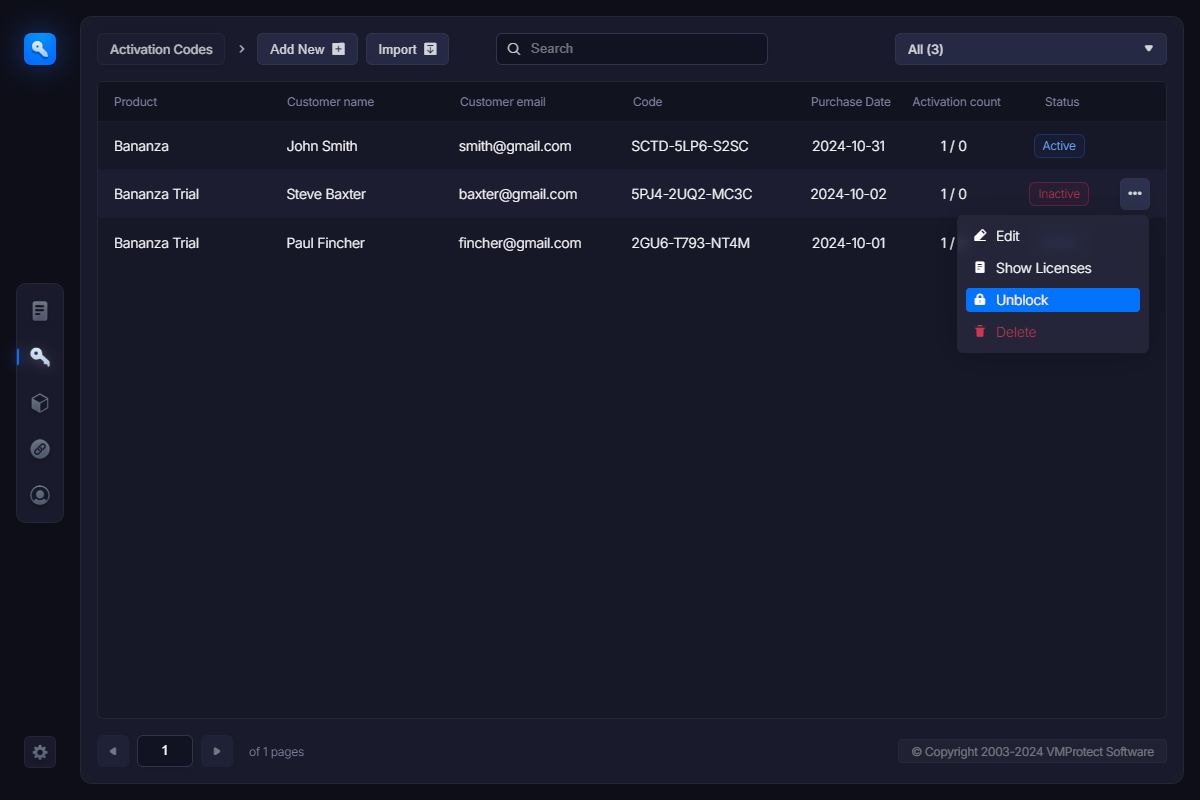
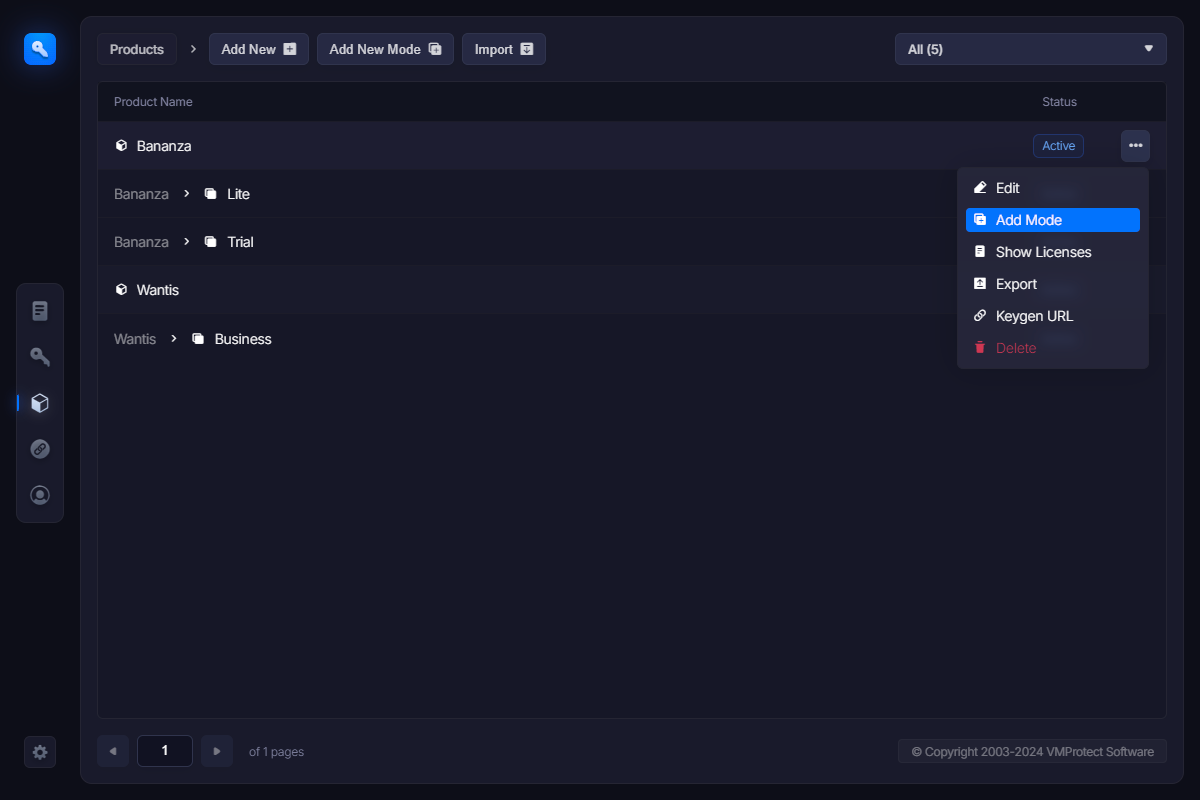
Since every user registers via the activation system, a vendor can manage and control every issued license: limit the number of times a license can be activated, block compromised registration keys, re-send lost keys and so on.

At the same time, online activation prevents unauthorized usage of the same license on multiple computers, stealing of the key and other types of frauds.

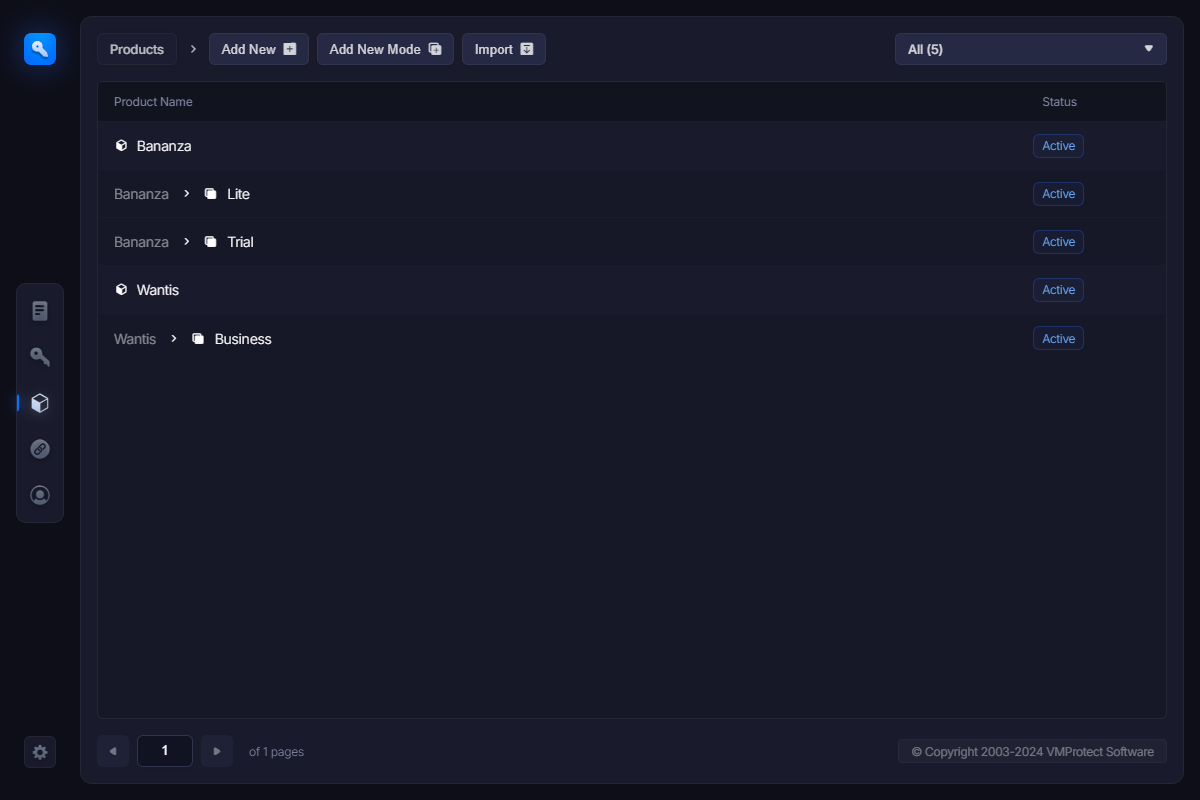
What is VMProtect Web License Manager (WebLM)?

Basically, any software vendor can take benefit of using VMProtect Web License Manager. WebLM delivers simple, fast and user-friendly way to embed an online activation system to software, track licenses and installations and manage license keys.

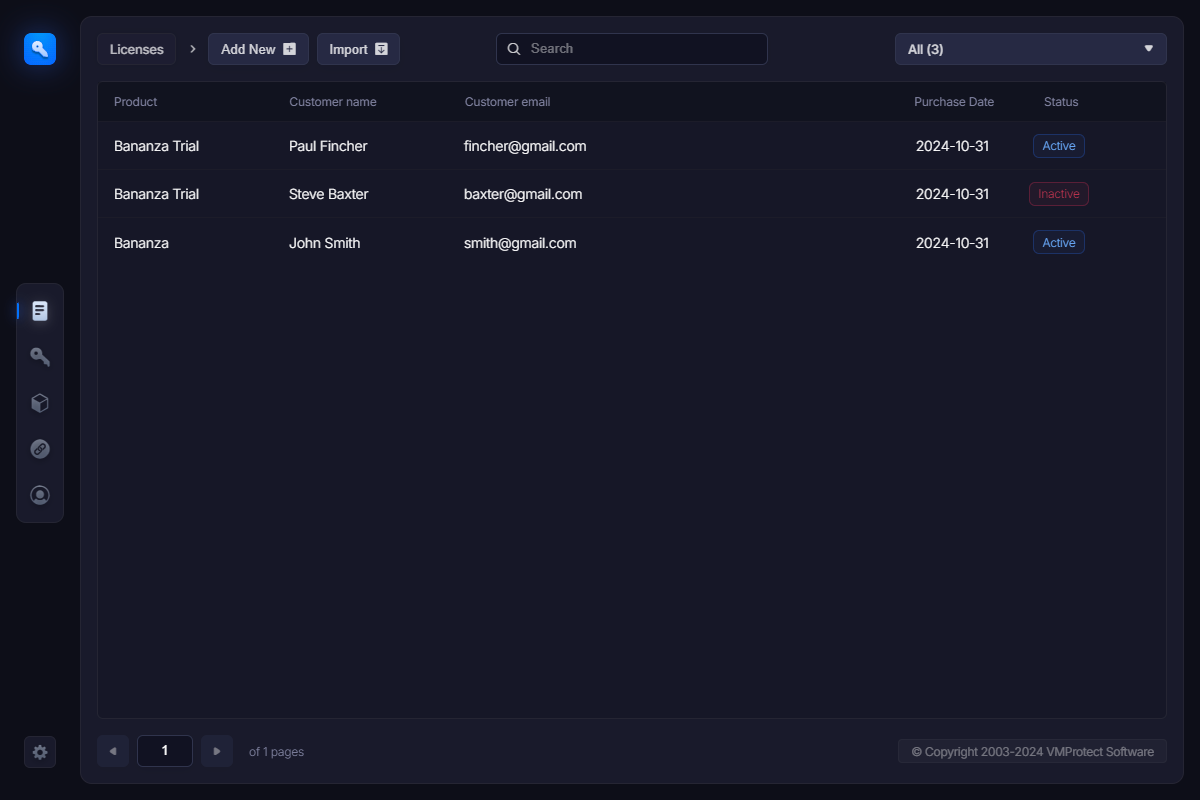
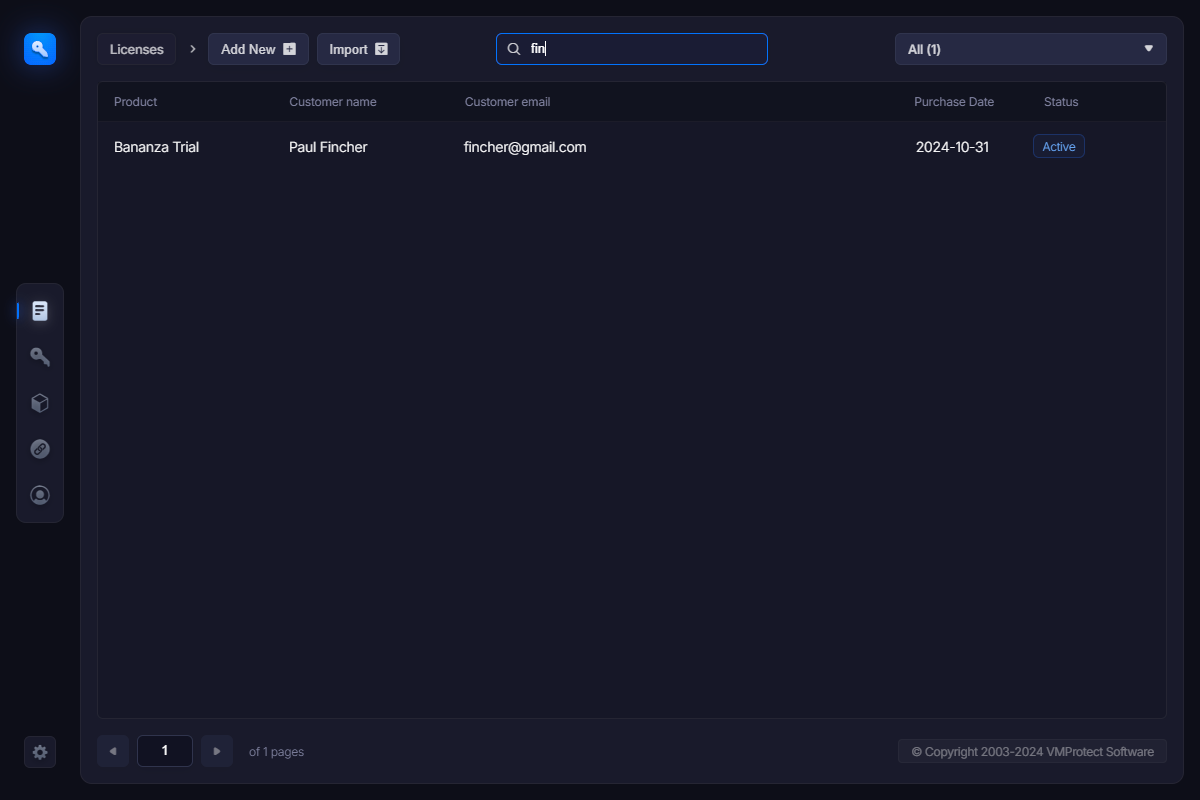
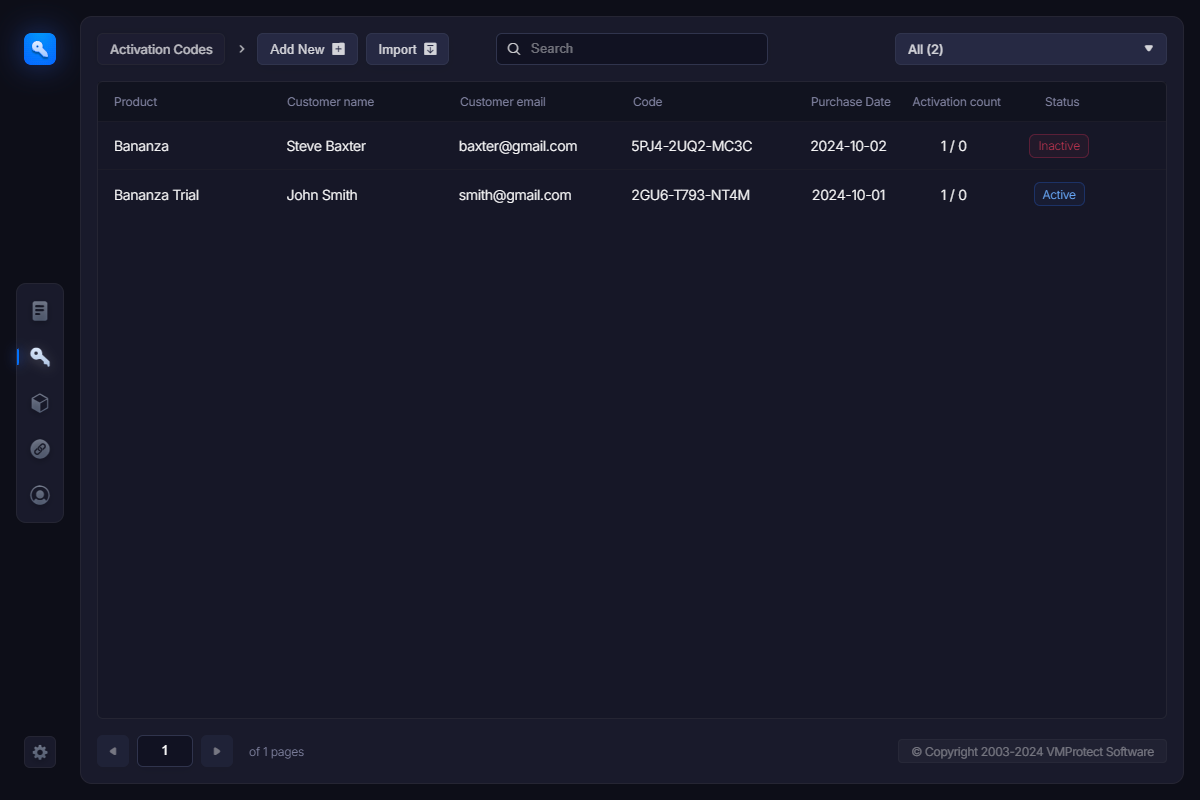
Web License Manager or simply WebLM is a full-featured software licensing and activation system. With it you can track online purchases, manage customers and license numbers, and control the number of installations of your programs.

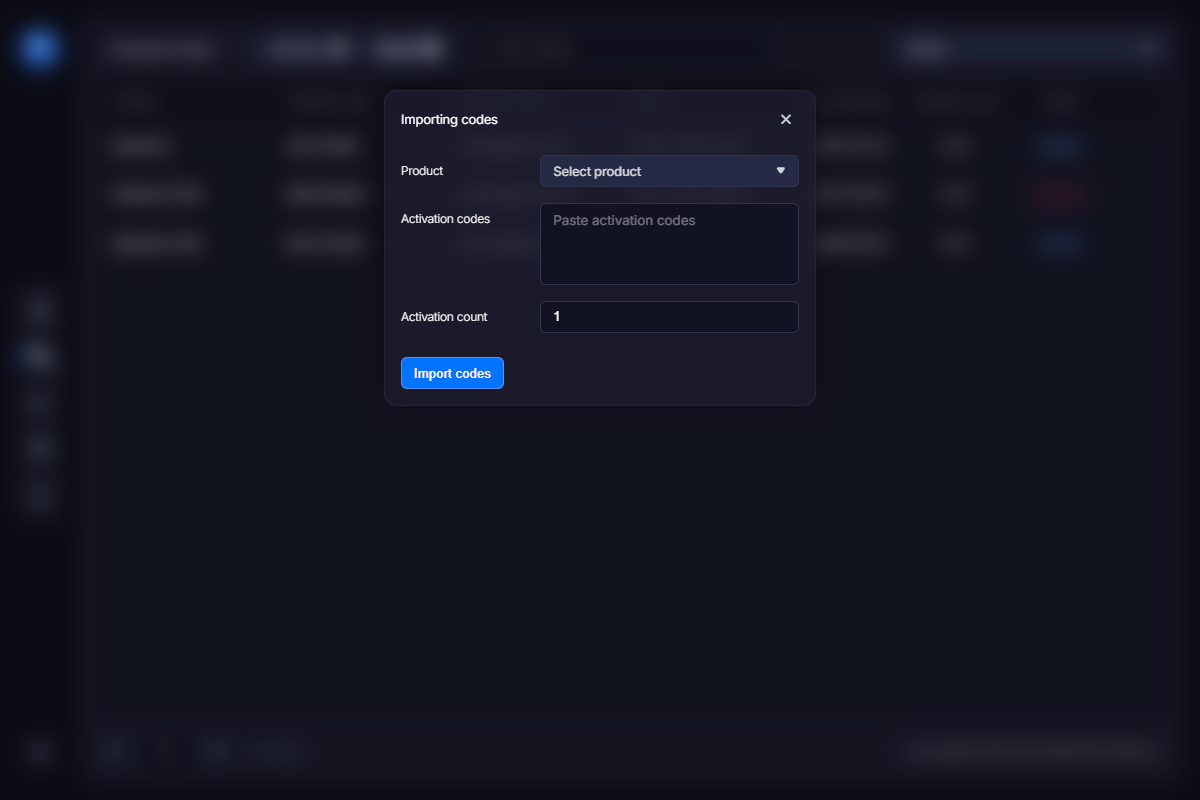
WebLM easily integrates to all major e-commerce providers and automates most of routine license management and control tasks – keeping registration information, sending and re-sending license keys, blocking stolen license keys and managing online activations.

WebLM works in conjunction with VMProtect Ultimate. The former provides firm and secure protection of your software from attacks, while WebLM simplifies managing and distribution of license keys.

Who needs WebLM?

Here is a simple questionnaire to see, if you need WebLM:

1. You want to safely keep customer data and be able to refer to them at any time, regardless of the e-commerce provider.

2. You need a web-based activation system to restrict unauthorized installs of your product.

3. You want short, easy-to-type activation codes for your software without jeopardizing its hack-proof capabilities.

4. You want to send license keys to users automatically upon purchase.

5. You need a way to block stolen or compromised license keys.

WebLM is all of the above, but if you answered Yes to at least one question, you still want to try it.

How it works?

Here is a more technical description of how online activation is implemented in VMProtect Ultimate.

Whenever a user attempts to activate the software with an activation code the following happens:

1. The software calls VMProtectActivateLicense function. This function compiles and sends a POST request to the activation server containing all parameters specified in the settings of this VMProtect project. It also sends the activation code entered by a user and the hardware ID of the computer.

2. WebLM receives this request and looks for the specified activation code in the database. There can be several possible outcomes depending on whether the code is found or not.

a. If the activation code isn’t found in the DB, WebLM returns the ACTIVATION_BAD_CODE error;

b. If the code is found, but is blocked, WebLM returns the ACTIVATION_BANNED error to the app.

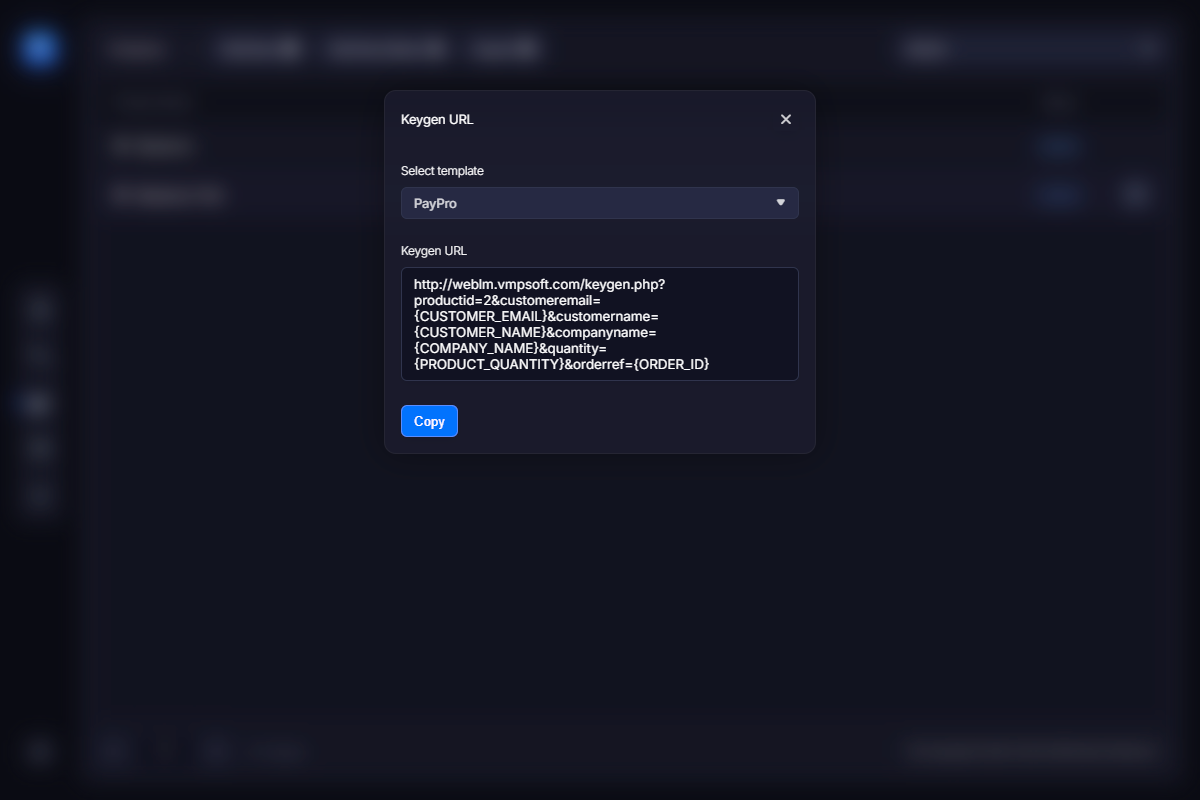
c. If the code is found, but it doesn’t match the product field, WebLM returns the ACTIVATION_BAD_CODE error. Obviously, a user can only activate the product or the product mode he did purchase. So if the hash of licensing parameters doesn’t match the hash of the given product, WebLM returns the ACTIVATION_BAD_CODE error. The hash of licensing parameters is encoded in the activation URL and is send along with other parameters upon activation attempt.

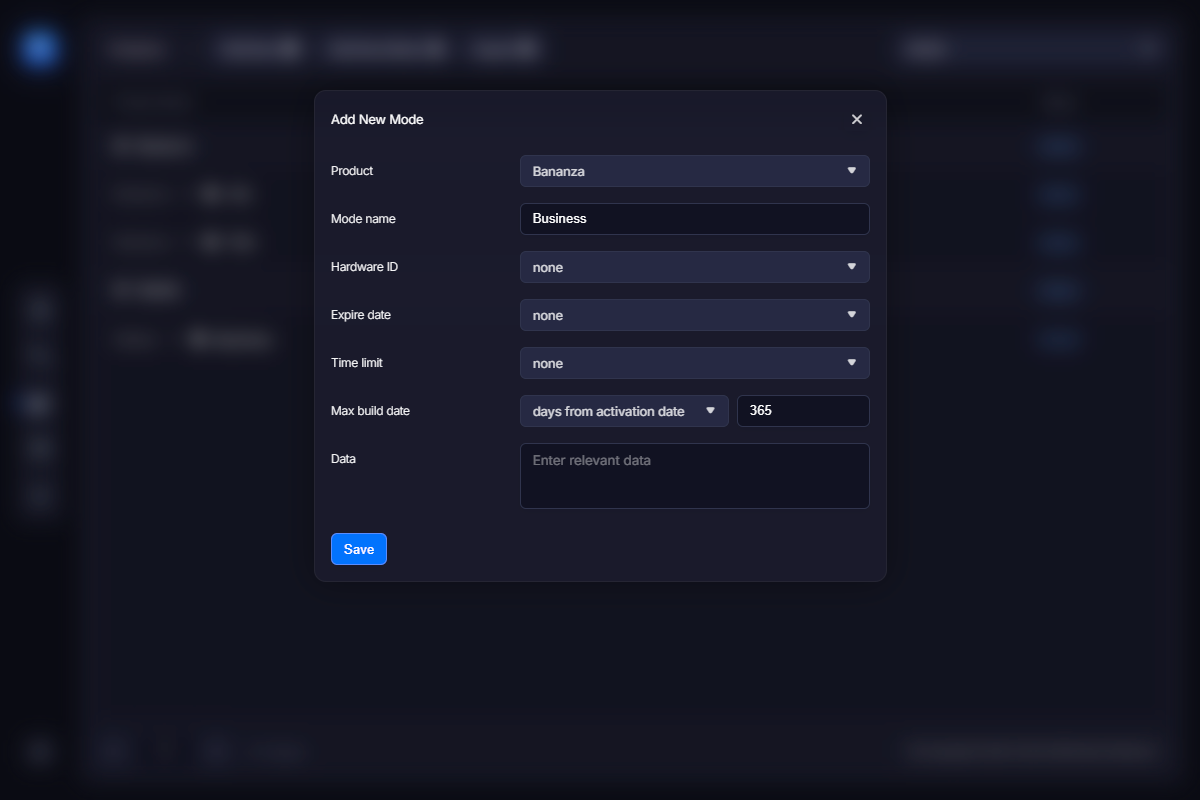
3. Then WebLM checks if the product or the product mode uses hardware id protection. If HWID binding is used, WebLM looks for a previously issued non-blocked license for that HWID. Otherwise, WebLM takes the very first license with no hardware binding. If a suitable license was found here, WebLM returns the corresponding serial number it to the application.

4. On the next step, WebLM calculates the number of available activations as follows: the amount of activations the activation code has minus the number of non-blocked licenses already issued for this activation code. If the result is zero or less, WebLM returns the ACTIVATION_ALREADY_USED error.

5. Next, WebLM checks the expiry date of the activation code. If such date is specified and that date has passed, WebLM returns the ACTIVATION_EXPIRED error.

6. If the number of available activations calculated on the step 4 is greater than zero, WebLM creates a license in accordance with product/mode parameters. The registration name and the e-mail of a customer are taken from the activation URL.

7. Finally, a new license (serial number) is returned back to the application.

Installing WebLM

WebLM installs on any Unix server with PHP5 and MySQL running.

Step 1: Uploading

You can upload WebLM via FTP or a file manager in the control panel of your web hosting provider. Create a folder where the Web License Manager will be installed. Upload the unpacked WebLM archive there and then type http://<yourserver>/<directory>/install.php in your browser.

For example, if you install WebLM to the weblm folder at www.mysite.com, the URL should be: http://www.mysite.com/weblm/install.php

You should see the installation screen like this:

If something goes wrong, you’ll see the error message. This means that some of the required software is not found on your server. Please contact us in that case, we’ll try to help.

If everything is OK, you just need to click the “Continue” button to begin the installation.

Step 2: Database Access

The next screen you’ll see is a database access form. There you should enter parameters to access databases on your server. Usually you get this from your hoster or from phpMyAdmin software. The fields are standard, so you shouldn’t have any problems with filling them. Not only does the table prefix parameter distinguish the WebLM tables from other tables in the database, but it also allows you to have several WebLM instances in the same database.

In case of multiple WebLM instances, you should choose this parameter carefully or you may override the other instance’s tables. However, this doesn’t matter if you install just a single WebLM instance.

After filling the form, click the “Connect” button. If all fields are OK, the “Connect” button changes to “Install Data Tables” indicating the successful connection to the database. Otherwise an error message is shown. Fix the issue it displays and try again.

When done, click the “Install Data Tables” button to allow WebLM create all tables it needs.

Step 3: Creating an Administrator

Now you need to specify a user with Administrator privileges who is allowed to access to the WebLM system. Fill the main user form. Put your name, e-mail and password as you usually do on other sites. Then click the “Create” button. You can change all parameters later, if necessary.

Step 4: Completing Installation

If everything goes OK, you should see the “That’s all” screen, which means that you have successfully installed WebLM without writing a single line of PHP code or something like this. That’s really cool.

Now go to the installation folder and remove the install.php file as suggested on the screen above. We also recommend removing the write permission from the configuration file. This is required due to security reasons. You don’t want others to re-install your system or take access to it by rewriting configuration parameters. So in order to prevent possible losses, take care of the security now.

 Usually, you can modify file’s permissions in the control panel of your hosting provider.

Quick Start Guide

So you have just installed Web License Manager as explained here. What now? Below is a very short start guide that helps you to setup everything you need to generate and manage serial numbers. The guide assumes that you use a more or less well-known e-commerce provider and understand how they usually process serial numbers. Are you ready? Login to the WebLM that you have just installed and let’s go!

Step 1: Create an Agent

The first thing you need to do is to create an entry for your agent (e-commerce provider). To do this click the “Add New Agent” link at the left panel. A form shown below appears. Put the name of your e-commerce provider there and then fill in the IP range it uses.

This step is required for security reasons. Simply put, you don’t want anyone accessing your activation server, so specify one or more IP ranges here to only allow requests from those IPs. You may ask your e-commerce provider for that range or search their site for it. You should end up with something like this:

Alternatively, you can use authorization using login and a password. This section provides more info on that option.

Click the “Save” button when done. You should now see the new entry in the list.

Step 2: Create a Product

The second step is to create or import a product. Product is a set of data required to generate serial numbers. You should create a new product every time you need a new type of serial numbers that are not compatible with any others. For example, if you already have a product “Word” and are about to release the advanced version “Word Pro”, you probably don’t need a new product, as they may share the same set of serial numbers. However, if you are going to release a “Photoshop” – it’s a good idea to create a new product.

Creating a New Product

Now let’s start from creating a new product from scratch. Click the “Add New Product” link at the left panel. Enter the name of the product. Leave all options with their default values for now:

Then click the “Save” button. You should see the new product in the list. Move the mouse to that item and you’ll see the set of actions you may do. We call this a function menu. You need to export that product to use it in VMProtect. Click the “Export” link and save the VMP file to the appropriate place. Now you may use it as a separate licensing data file, keeping the protection stuff in another file. This allows you to sync the online and offline versions easily.

Importing Existing Product

Another way to add a product is to import the existing VMP file with the licensing data. Again, we suggest splitting the licensing information from the protection data in VMProtect, so you can sync the licensing data easier. Now when you have a good VMP file with the licensing data, click the “Import Project” link at the left panel.

Pick the project file and click the “Import” button. After confirming the operation the product will be added to the list.

Synchronizing online and offline copies

Both methods can be used to synchronize online and offline copies of your VMP file. You should keep offline version up-to-date to be able to block compromised serial numbers. Usually you export the product and replace the local VMP file just before you build the new release. This way all blocked serial numbers become really blocked.

Once again, we really suggest to separate protection stuff from the licensing data using a separate VMP file for the licenses. If for any reason you have changed the local version of the VMP file, just import it as a new product. Web License Manager detects that and updates the online version of the project.

Step 3: Generate a Serial Number

Now we are ready to generate a serial number. For the sake of this guide we’ll do this manually. Normally, serial numbers are generated by a request of your e-commerce provider (agent). However, you may use manual generation of a serial number if you want to give a free license to some one, or provide a serial number for a product review.

Click the “Add New License” link at the left panel and you will see the new license form. Pick your product from the very first drop-down list and fill the top set of fields. Like below:

Now click the “Save” button to generate a license.

Step 4: Setup the Automatic Serial Number Generation

At last we’ve come to the most important part – setting up of the automatic serial number generation upon request from your e-commerce provider. Basically, most of e-commerce providers allow vendors to have serial number generators on their own sites. In that case e-commerce provider just calls a vendor-specific URL and passes some parameters such as the customer’s name and e-mail as parameters.

Login to your e-commerce provider’s vendor panel and locate the custom keygen URL entry form. You can see how to configure a keygen of several popular e-commerce providers here. Now go to the products list in WebLM and locate the product that we have just created. Move mouse over it and click the “Keygen URL” link:

Some most popular e-commerce providers are hardcoded into WebLM, so you may simply copy the URL and paste it to the e-commerce provider’s form opened on the above step. Otherwise, you still should copy the URL, but you may need to adjust the template parameters so that your e-commerce provider can substitute them with the real data.

That’s all! Now you place a test order and check if a new license has been added to the list.

Licenses

The Licenses section of the WebLM control panel displays all licenses (customers) of all your products.

By pointing a mouse over a specific line, you can see a function menu. It allows you to edit the license, copy the associated serial number to the clipboard, block the serial number or delete the license.

Further reading

Adding a license

To add a new license, click the Add button above, or select the Add New License item in the Licenses section at the left. The following screen appears:

Select the product the new code applies to. Then, fill in the customer name, e-mail address, purchase date, and order reference number and optional comments. The second block of options is mostly used with automatic license key generation.

Hardware id links the serial number to a particular hardware configuration effectively preventing multiple activations of the software with the same serial number on many different computers.

The Expire date parameter defines how long the serial number should work. The Time limit option sets the amount of minutes the license remains valid after the software is launched. Both options are convenient for providing limited time keys, free time-limited giveaways, giving keys to people for testing and other means.

The Max build date option can be used to make some licenses valid only up to a certain software version compiled earlier than the specified date. That is, such a license would work with say version 1.0, but would stop working with version 2.0 as long as its compilation date is later than the value of this parameter.

The Data option allows you to encode additional data into the serial number and securely pass this information to the software to make it react, function or look different depending on that data. For example, you could pass the branding information to the software to display different logotypes or links inside. Other example is limiting functionality of the software depending on particular conditions. You can pass those conditions via the Data field. The application can retrieve serial number data using the VMProtectGetSerialNumberData API function.

Note: you can enter both text and binary data to this field. The binary data should be entered using the "\x" prefix and an appropriate hexadecimal code: \x20.

Searching for a license

WebLM provides a simple way to search for a given license. Start typing a name, e-mail, a product name or a date and the list will filter out automatically displaying licenses that match the typed string.

Editing a license

At first, you may want to use the filter as described above if there many licenses in the list. Then, point the required line with the mouse cursor, the function menu appears. Click the Edit item. This will open the same screen as with the Add license function. However, you cannot change the license key block now.

Click the Save button when you’re done.

Copy serial number

Bring up the function menu of the license you want to copy the serial number for. Click the Copy Serial Number item. This option allows you to copy the long serial number of the license to the clipboard. You can paste it to VMProtect then, to verify it or for other purposes.

Blocking compromised licenses

Sad but true – sometimes a serial number may become compromised. The license could be stolen, or the user violates license agreement, or the user requested for a refund or made a chargeback and therefore doesn’t have right to use your software anymore.

In all these cases, blocking a license is a solution. Simply click the Block item in the function menu to block the serial number. Now, any activation attempts made with this serial number will fail. The blocked state of the license is indicated with a lock icon.

Whenever you want to unblock the key back, click the Unblock item.

See also: activation/deactivation of a code

Deleting a license

Bring up the function menu of the license you want to delete and click the corresponding item.

Important! Please note, blocking a key and deleting it are not the same. When you block the license, it stays in the system and prevents users from registering the software with that key. A deleted license simply doesn’t exist. A rule of thumb here is to block compromised licenses, but to delete licenses issued by mistake and never used by anyone.

Importing licenses

You can import licenses from VMProtect serial number by pasting it to WebLM:

Imported licenses are added to the list of licenses and work as usual.

Activation Codes

Activation codes are a simple way to provide a user with an easy to type registration key. The Activation Codes section of the control panel allows you to manipulate with activation codes.

By pointing a mouse over a specific line, you can see a function menu. It allows you to edit the activation code, copy the associated licenses, block the activation code or delete it.

Adding new activation code

To add a new activation code, bring up the function menu and click Add. Alternatively, you can click the Add New Code item in the Activation Codes section. The following screen appears:

Select the product the new license applies to. Then, fill in the customer name, e-mail address, purchase date, and order reference number.

Activations count sets the number of times a user can activate this particular activation code. Whenever the activation count is exceeded, the product cannot be activated anymore. VMProtect allows a user to deactivate certain licenses to increase the number of activation counts, and therefore to activate the product on a new computer. Also, the activations count can be zero. In this case, the activation code can be used unlimited number of times. You may want to use this option for a trial activation code, or for give-away versions of the program by combining zero activations count with a certain expire date (see below).

The Expire date parameter defines how long this activation code should work. If a user attempts to activate the code after the specified date, the activation fails.

Adding activation codes manually is mostly used when you need to add a code to activate the trial version of the product (see this section for more info), or when you want to provide some user with a registration key for free, without actually purchasing it – a journalist writing a review, a friend of yours, as a reward to a well-contributing user and so on.

Searching for a code

WebLM provides a simple way to search for a given activation code. Start typing a name, e-mail, a product name, a purchase date or an activation code and the list will filter out automatically displaying lines matching the typed string.

Editing a code

Filter out the list of codes as described above to quickly locate the given activation code and the customer. Then, point the required line with the mouse cursor, the function menu appears. Click the Edit item. This will open the same screen as with the Add New Code function. However, you cannot change the associated product and the activation code itself now.

Click the Save button when you’re done.

Displaying licenses

This option allows you to see all licenses activated with this particular activation code. An activation code can be activated multiple times, and with this tool you can easily locate all customers who did.

Blocking compromised codes

Sometimes you may want to block a certain activation code if it is compromised – stolen or used illegally.

To block an activation code click the Block item in the function menu to block the code. Now, any activation attempts using this activation code will automatically fail. The blocked state of the activation code is indicated with a lock icon.

Whenever you want to unblock the code back, click the Unblock item.

See also: activation/deactivation of a license.

Deleting a code

Bring up the function menu of the activation code you want to delete and click the corresponding item.

Important! As with licenses, blocking a code and deleting it are not the same. When you block the activation code, it stays in the system and prevents users from activating the software with that code. A deleted activation code simply doesn’t exist. A rule of thumb here is to block compromised activation codes, but to delete codes issued by mistake and never used by anyone.

Importing codes

You can import activation codes by pasting it to WebLM:

Imported activation codes are added to the list.

You may need importing of activation codes if you migrate to VMProtect Web License Manager from another license management solution, or if you had old activation keys that should remain working in the new version of your software powered by WebLM.

You can import multiple activation codes by pasting or entering them one per line. In addition, you can specify customer name and e-mail using the following format of the data pasted into the import dialog:

CODE1;CUSTOMER1;EMAIL1

CODE2;CUSTOMER2;EMAIL2

Products

The key notion in the WebLM functioning is a product. Before you add any licenses or activation codes you should add your software product to the system. VMProtect and WebLM allow you to implement virtually any license paradigm you want for your product. You can disable certain functions in the unregistered version, let the program work up to a specified date only, enable or disable features depending on the purchased license type and many more.

The Products section of the WebLM control panel displays all products entered to the system.

There are two types of products in WebLM: core products and product modes. Modes represent different ways the product should behave depending on a license. You can read more about product modes here.

By pointing a mouse cursor over the line, you bring up the function menu.

Adding a product

To add a product, click the Add New button above, or use the Add New Product item in the Products section at the left. The following screen appears:

Product name – enter the title of your product.

Algorithm – defines the algorithm VMProtect will use to generate a pair of encryption keys. Currently, only RSA is supported.

Bits – determines the length of the encryption keys. The longer the key, the harder is to crack it. However, long keys take more time to process by the software. If you are unsure, stay with the default value.

Keygen mode – there are two options here: Serial Numbers and Activation Codes.

The key generator (keygen) can produce either long serial numbers or short activation codes to send to the customer. While a serial number immediately registers the application, an activation code is merely a string of symbols tied to a particular customer. Then, that customer uses his or her activation code to activate the application and receives the serial number to register the application and unlock full functionality of the program and remove all trial limitations. This part goes silently without any actions required from a user. So the only key he actually deals with is a short and convenient activation code.

When the Activation code mode is selected, two more fields are shown:

Activation code pattern – sets the way an activation code should look like.

Extra activations – normally, every license can be activated once per purchased copy. You can allow more activations for each copy of the application by increasing this value. For instance, if you set 3 here, each purchased copy of the program will allow 4 activations in total.

Adding a product mode

Product modes are various states the software may work in. Common examples of product modes are trial mode and full-featured mode. Other possible uses of this function is implementing various licensing schemes (home license, business license, enterprise license) having certain functional differences or making alpha/beta/promo versions with certain time limitations. You can also create custom license types using the Data field (see below).

You can add a new mode to the product in two ways: either click the Add New Mode item in the Products section, or point a core product line in the list to bring up the function menu, and click the Add Mode link:

The following screen appears:

Select the product this mode applies to and specify the name of the mode. The rest options specify the way this product mode is limited:

Hardware ID – links the serial number to a particular hardware configuration effectively preventing multiple activations of the software with the same serial number on many different computers. You can tell WebLM to take hardware information from the URL – in this case it is passed from user’s computer upon first activation. Or you can specify a certain value manually – this allows you to lock this product mode to the specific computer only.

Expire date – sets the period this product mode remains active and available for activation.

  • “none” means the product mode never expires – use this for full-functional versions of your software only;
  • “days from activation date” – the product will be active and available for activation for a specified number of days since the activation date. This is a great option for trial versions of the software.
  • “days from purchase date” – very similar to the above, this option permits usage of the product for the specified number of days since it was purchased. You may want to prefer this option if you need to encourage users to activate the program shortly after the purchase.
  • “value” – set the date manually. This option is good for beta versions or promo licenses that should not work past the specified date.

If the expire date is set, the application can read the expiration date from the serial number and warn a user about upcoming expiration.

Time limit – sets the amount of time the application can work if launched. Games or multimedia software are usually the best candidates for such type of limitation.

Max build date – use this option to prevent running newer versions of the software with the same key. For example, you can allow free upgrades of the product within 120 days after the purchase and require paid renewal otherwise.

Data – you can pass additional information to the application in this field. Fill it with specific data to add more conditions to functional limitations, or use this field to indicate various versions of the product and make it respond this or that way. The application can retrieve serial number data using the VMProtectGetSerialNumberData API function.

Note: you can enter both text and binary data to this field. The binary data should be entered using the \0x prefix and an appropriate hexadecimal code: \0x20.

Show licenses

Use this function menu item to display all licenses issued to this product. If you run this function within the core product, it displays all licenses of all modes of this product. Otherwise, the list displays licenses for the selected product mode only.

Editing / Deactivating a product

Point a product in the list with the mouse cursor and click Edit. You can change options just like you do when you add new product. You cannot change the product name, though.

Additionally, you can deactivate the product completely, blocking all activation attempts for this product temporarily.

Keygen URL

A keygen, or a key generator if you prefer the full name, is a special program that takes user data send by an e-commerce provider (name, e-mail, order id etc.), generates a serial number or an activation code, and sends it back to the e-commerce provider, which then passes the serial number to the user.

WebLM provides a built-in keygen, so you don’t need to write a single line of code. You only should tell your e-commerce provider the keygen URL for each product. To learn the keygen URL of a product, point the mouse over it to bring up the function menu and click the Keygen URL link.

Then, you need to specify this URL in your e-commerce provider’s control panel. Please refer to this section to learn how you can do this in major e-commerce providers.

Importing / Exporting a product

The VMProtect and WebLM tandem allows you to create a product both in VMProtect application and in WebLM. So you can import a product to WebLM from VMProtect, or vice versa export a product from WebLM to a .vmp project.

To import a product to WebLM, click the Import Product item in the Products section at the left and select a file to import. To export a project, point your mouse over it in the list and click the Export link in the function menu. Note: you can only export core products. Product modes cannot be exported.

Deleting a product

Bring up the function menu of the product you want to delete and click the corresponding item.

Important! Deleting a product will delete all associated licenses and activation codes. The users won’t be able to activate the software anymore! Note that even if you recreate this product from scratch this won’t allow your old users to activate it, because the pair of RSA keys will be different, effectively rendering old keys invalid.

If you want to temporarily cease all activations for a specific product, deactivate it instead.

Agents

The Agents section allows you to specify who is permitted to access the activation system and the keygen. The keygen generates serial numbers and activation codes, so you should not allow everyone to open the keygen URL – only e-commerce providers should have access to the keygen.

The Agents section displays e-commerce providers and other e-commerce agents allowed to access the keygen. If it is your initial setup, the list is empty.

By pointing the mouse cursor over a certain line you can edit the selected agent or delete it. To add a new agent, click the Add New button above, or select the Add New Agent in the Agents section at the left.

Adding a new agent

Click the Add New button, or use the left menu to bring up the following dialog:

Agent name – enter the name of the e-commerce provider or agent.

Auth mode – there are two of them: by IP and by login and password.

Authentication by IP means that queries from certain IP range are allowed, while requests to the keygen from all other IP addresses are automatically denied. You can specify one or more IP ranges using the fields below:

Authentication by login and password will require a login/password pair from any host attempting to send a request to the keygen. The access is granted only if valid login and password were sent by the agent. Some e-commerce providers may not have a static IP address, so authentication using a login and a password should be used then. You can specify the login and password in the corresponding boxes.

Users

The Users section allows you to manage and control users accessing the WebLM control panel. The list of users looks as follows:

In the Users section you can see all users that can open the control panel. There are two types of users in WebLM: Administrators and Managers. Administrators have full control over WebLM. They can add or remove licenses, activation codes, products and users. Managers can only deal with licenses and activation codes.

That is, you can create several Manager-level users to add new users, send license keys or block compromised activation codes, and one or more Administrators to manage products and other users. Of course, if your company is small, you can create just one Administrator account that will be doing everything.

Adding a new user

To add a new user click the Add New button on the toolbar, or use the Add New User link in the Users section. You should see the following screen:

Type the username of a new user. This will also be the login of this user. You should also enter an e-mail address of the user and specify a password. Finally, select a role of this user – an Administrator or a Manager.